The transition from a digital layout to a finished physical product requires a specific set of technical adjustments. If your margins are too tight or your resolution is low, the final print will show those flaws immediately. Achieving a professional look depends on how you prepare your bleeds, color profiles, and binding areas before the file ever reaches the press.
How do I optimize my booklet design tips for high-quality printing?
Same-day booklet printing requires files with 0.125-inch bleeds, 300 DPI resolution, and CMYK color conversion to prevent production delays. Accurate safety margins of at least 0.25 inches ensure text is not lost in the binding gutter. High-quality PDF exports with embedded fonts are the industry standard for clean, sharp edges on every page.
| Category | Value | Notes |
| Bleed Size | 0.125 inches | Extends background past the cut line. |
| Resolution | 300 DPI | Prevents pixelation in final print. |
| Color Space | CMYK | Ensures color accuracy on physical paper. |
| Safety Margin | 0.25 inches | Keeps text away from the trim edge. |
Designing for the Gutter and Creep
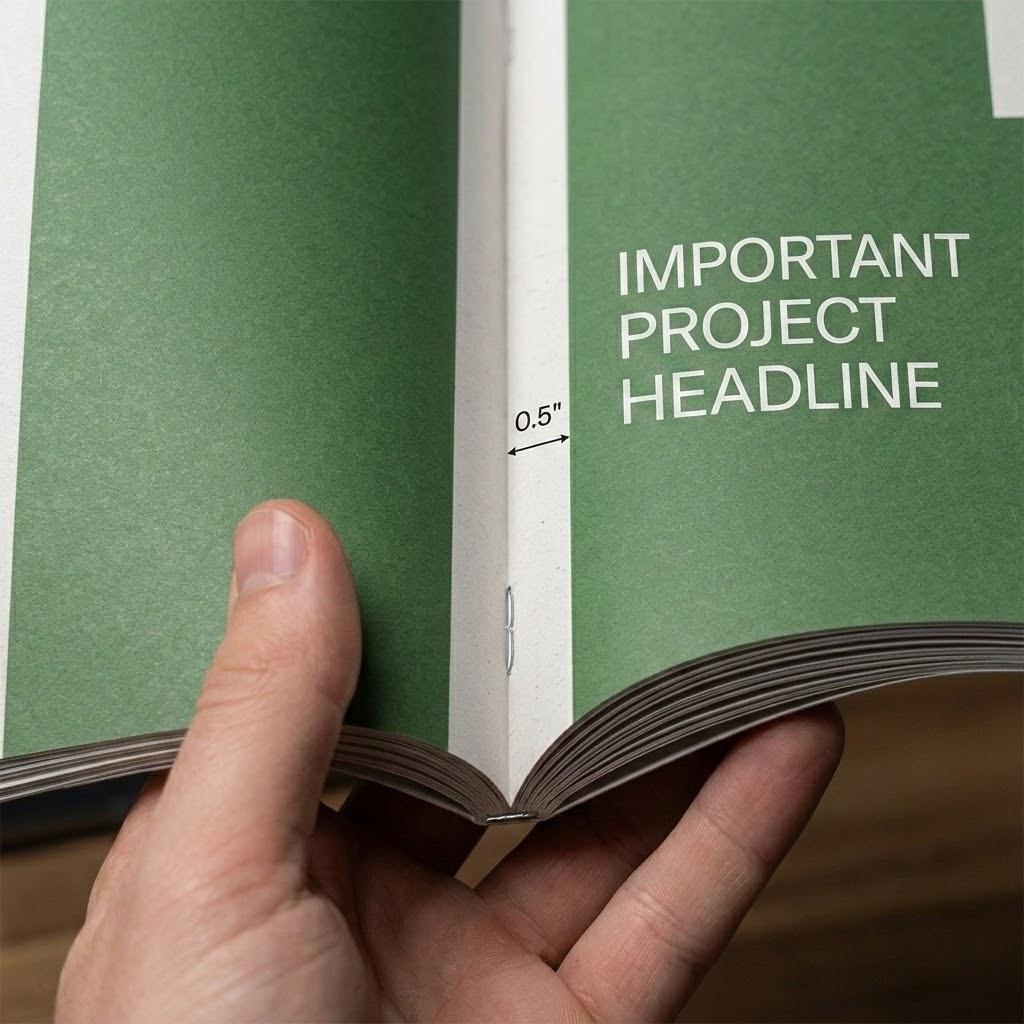
When you are putting together a multi-page project, the center fold is your biggest hurdle. This area is known as the gutter. If you place important text or a person’s face directly in that center seam, the binding process will swallow part of the image. For thicker booklets, you also have to deal with “creep.” This happens because the inner pages stick out further than the outer pages once folded.
If your page count is high, then you must increase your outer margins to compensate for the trim. We recommend keeping all vital information at least 0.5 inches away from the binding edge for perfect readability. This is one of those booklet design tips that separates amateur DIY projects from professional marketing materials.
Resolution and Image Integrity
Here’s the reality about digital images: what looks good on your phone often looks blurry on paper. Most web images are 72 DPI. Printing requires 300 DPI at the actual size you want the image to appear. If you stretch a small photo to fit a full page, you will see jagged edges and “noise.”
- Always link high-resolution original files rather than embedding low-quality previews.
- Check your effective PPI in your design software to ensure it stays above 300.
- Avoid using images pulled directly from social media as they are heavily compressed.
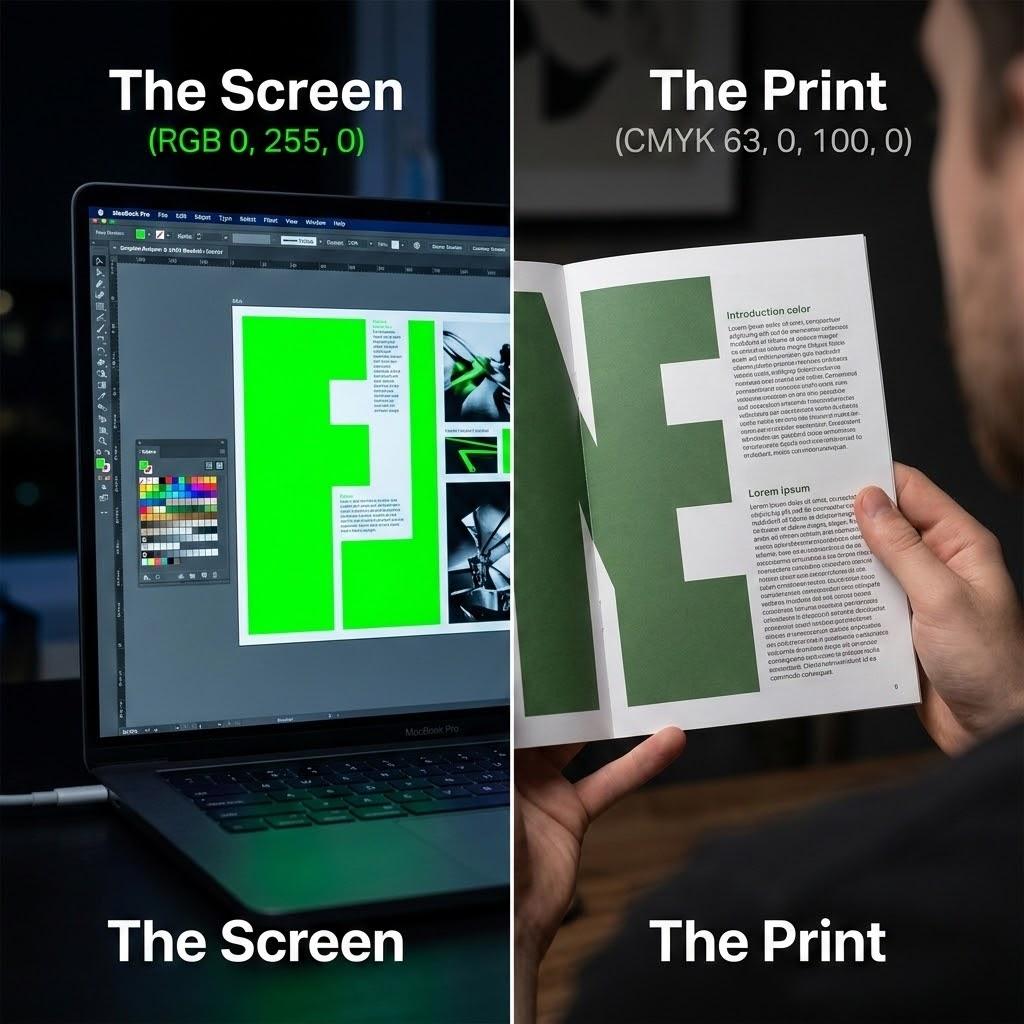
The CMYK Color Shift
Your computer monitor uses light (RGB) to show colors, but a printing press uses ink (CMYK). This is why a bright neon green on your screen might look like a muddy forest green once it is printed. To get a clean result, set your document color mode to CMYK from the very beginning.
If you design in RGB and convert at the end, your black tones might look washed out. Creating your file in the correct color space allows you to see a more accurate representation of the final product. We see many files where the “rich black” settings are off, leading to greyish text. For a deep, dark black, use a mix like 60C 40M 40Y 100K.
Font Management and Vector Art
Small text can become unreadable if it is not handled correctly. Thin serif fonts often “break up” if they are printed as a light color against a dark background. This is called “knocking out.” To keep your text crisp, use vector-based elements whenever possible.
- Convert all your fonts to “outlines” or “shapes” before exporting the final PDF.
- Maintain a minimum font size of 6 points for legibility.
- Use 100% black for small body text to avoid registration issues where colors bleed.
Preparing the Perfect Print-Ready PDF
The export stage is where most errors happen. You might have a beautiful design, but a bad export will ruin the work. When saving your file for booklet design tips, select the “PDF/X-4” preset. This format preserves transparency and layers while ensuring the printer gets exactly what you see.
Ensure that “Crop Marks” and “Bleed Marks” are turned on in the export settings. This tells the finishing team exactly where to cut. If these marks are missing, the shop has to guess where your layout ends, which leads to white borders or cut-off text.
Material Selection and Paper Weight
Your design should match the paper you choose. A heavy 100lb gloss cover gives a premium feel, while a 70lb matte text is better for the inside pages of a long manual. If you are using a lot of dark ink, a UV coating or lamination will prevent the ink from cracking at the fold.
If your booklet is meant to be written in, then avoid glossy coatings on the inside. Pens will smudge on gloss paper. Choose an uncoated or “book” stock for workbooks or journals. These booklet design tips help you avoid the “money problem” of paying for a reprint because the paper didn’t match the intended use.
Final Technical Audit
Before you hit send, do a quick flip through your digital file. Check that your page count is a multiple of four. Saddle-stitched booklets are made of folded sheets, so a single sheet equals four pages. If you have 21 pages, you will end up with three blank pages at the back.
- Verify that all images are CMYK and 300 DPI.
- Confirm that bleeds extend 0.125 inches past the trim line.
- Ensure the page count is divisible by 4 (e.g., 8, 12, 16, 20).
Frequently Asked Questions
What is the best file format for booklet printing? A high-resolution PDF is the industry standard. It locks your fonts and images in place so they don’t move when opened on a different computer.
Why do I need a bleed in my design? Printers cannot print all the way to the very edge of a sheet of paper. We print on a larger sheet and then cut it down. The bleed ensures that your background color goes all the way to the edge without leaving a thin white line.
How many pages can a saddle-stitched booklet have? Usually, you can go up to 64 pages. Beyond that, the booklet becomes too thick to stay flat, and you might need to look into perfect binding. This is a key part of our booklet design tips for clients with large catalogs.
Get Professional Results Today
Ready to see your hard work in print? Guru Printers offers fast, high-quality production for all your business needs. Whether you need a small batch of lookbooks or a large run of catalogs, we ensure your files come out clean and vibrant.
Call us at (213) 612-4451 to start your order!