100LB Gloss Book Brochures and Flyers

  • Sizes *

  • Sides *

  • Weight *

  • Coating *

  • Folding Options *

  • Quantity *

  • Artwork *

  • Turnaround Time *

  • Upload Files (Front) *

    Max file size: 100 MBPermitted file types: jpg jpeg jpe png gif pdf

  • Upload Files (Back) *

    Max file size: 100 MBPermitted file types: jpg jpeg jpe png gif pdf

  • Get Sheet Value *

  • Weight Calculation *

Brochure and Flyer Printing Specifications:

  • Brochure and Flyer Sizes: 8.5″x 5.5″, 8.5″x 11″, 11″x 17″
  • Custom Brochures and Flyers are printed in a four color process on one side or both sides
  • AQ Matte Coating
  • 100# AQ Semi-Gloss Coating
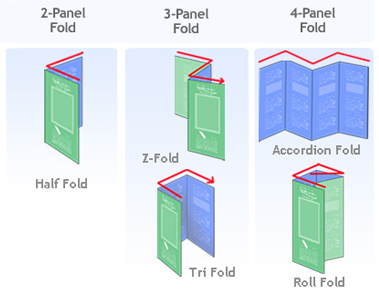
  • Folding Options: Flat, Tri-Fold, Z-Fold, Accordion Fold, Double Parallel Fold, Horizontal Half-Fold, Vertical Half-Fold, Roll Fold, Double Gate-Fold
  • Go Green Paper
  • Soy-based ink printing.
  • Turnaround Time: 5 Business Days, 3 Business Days
  • Cutoff time for all orders is 8:00 AM PST (Monday-Friday). Orders placed after cutoff time will be reconciled the following business day. Please note, turnaround time does not include Digital proof preparation.

Custom Brochures Printing Los Angeles make a great marketing tool. They offer you a chance to pitch big ideas in a small package or create quick advertising, ideal for limited time discounts and deals. A successful brochure or flyer experience has three stages. First, figuring out the content. Second, design and printing specifications. Third, getting your time-sensitive documents to you ASAP.

Figuring out Content:

The first step to printing successful brochures and flyers is to decide on your content. Unfortunately, this is one thing that Guru Printers can’t do for you. You need to decide what you want your brochure to accomplish, and what information absolutely needs to be on your flyer. For example, if you need product images, you’ll have to provide them yourself. This part of the process tends to be the longest and most complicated. Keep your head up! It only gets easier from here.

Design and Print:

Once you decide on your content, the second stage is to design and print your materials. This is where Guru Printer comes into play; we’re the experts when it comes to brochure and flyer printing. You can be as involved or as uninvolved as you would like. If you’ve already figured out the exact specifications for your brochure, all you have to do is upload your plans to our website, and you’re done.

If you’d rather leave designing to the professionals, we can still help. Guru Printers offers in-house graphic designers who can make your content shine on the page. Answer a few simple questions about what you want, and a Guru Printers designer can take it from there. Do you have a specific matte or coating you want to use or know which fold you want? With the basic information and your content, Guru Printers can put together a gorgeous printed item for you.

Receiving Your Materials:

The last stage of brochure and flyer printing is getting everything to you. Guru Printers offers both 5-business and 3-business day packages, but remember that these include print time only. If you’d like Guru Printers to design your brochure, that will take some time as well. Once they complete the printing job, it’s up to decide the transportation method. If you’re in the downtown LA area, you can pick your products up in person. Otherwise, Guru Printing offers competitive shipping locally and to Canada.

Brochure and flyer printing can boost your business. To make sure you’re hitting the ground at the right time, plan your order process to account for the three stages of brochure and flyer printing. Gather your content, contact a graphic designer, and get ready to get your products.

What size and folding option is most common for brochures?
The most common brochure folding is Trifold and the most common size is 8.5″ x 11″.

Business Brochures for your unique brand

Brochures are generally used to acquaint customers and clients with a company’s products or services.  As a popular marketing material, they are great for raising brand awareness while describing the key features of your business and what you offer.

Benefits of brochures for small businesses:

  • Inexpensive marketing material not only with regard to printing but also in design as there are many free brochure templates you can use saving money on hiring a designer.
  • Easy to distribute whether that be handing them out to potential clients at a trade show or as an informational item at your checkout stand.
  • Brochures convey a feeling of professionalism in their layout and design that leaves an impression on consumers.
  • Versatility is another great advantage of brochures as they can be mailed out, handed out in person at the checkout stand or at trade shows.
  • Brochures allow you to present in depth information about your products and services due to their multipage layout. Unlike postcards or flyers, brochures are the perfect medium by which to convey details about your business and what sets your apart from others.

Guru Printers tips on making a brochure.

  • Use impactful images. Consumers register and retain images more effectively than words. Using high quality images that relate to your message ensures that your brochure will be impactful. Present your customers with the product and services you provide by utilizing clear pictorial depictions.
  • Keep your fonts simple. In most cases a heading, subheading line, and body font will suffice. Keeping your brochure somewhat minimalistic with regard to text ensures that it will be easy to read.
  • Place your images strategically in key areas that relate to the text and information being provided.
  • Organize your brochure in segments using headlines.  Remember, you want your customers to be able to not only read your info but understand it in an easily digestible way. Impactful headlines that summarize the major portions of your brochure’s body text ensure that customers will retain clearly what your business is all about.
  • Design and color is what really carries the eyes across folds of a brochure to be sure to use design elements that will make your brochure stand out while catching the eyes

Choose a fold.  Guru Printers offers a variety of formats for your brochure that go beyond the standard rectangular form.  We offer tri- fold brochures, half fold, Z Fold, gatefold, and die-cut fold brochures as just a few ways to set you apart from the rest.

Shipping Timeframes

California

shipping times based on Pacific Standard Time product shipping information
Guru Printers produces all orders respective to when they are processed and batched on the production queue. Although, we try our best to produce all orders accordingly based on your geographical proximity to a production facility, we cannot make any guarantees that your item will be produced out of a specific location.

File Setup

In order to ensure your files are print-ready, we recommend that you upload them in PDF format. When you generate a print-ready PDF, your computer will use the settings in Adobe Acrobat Distiller or any other PDF generating programs you may use. Please make sure that these are set properly before generating your PDF file.

If you are uploading PDF files created in Photoshop, please be sure all layers are flattened.

We also accept .JPG (JPEG), and .TIF (TIFF) file types, however PDF is the preferred format.

Check your file to make sure it meets our file creation guidelines. This will help speed up the production of your project and give your printed piece the best results.

  1. Use the CMYK colorspace (Cyan, Magenta, Yellow, blacK). These are industry standard printing colors. CMYK colors are different than RGB (Red, Green, Blue), which are used to display colors on your screen.
  2. Use a minimum resolution of 300 dpi for image files.
  3. Specify trim area with crop marks. (Don’t place crop marks inside the work area.)
  4. Artwork should have 1/8″ (0.125″) bleed extending past the trim line. This is to prevent minor cutting variations from leaving unintended results at the trim edge.
  5. Safe Area is the 1/8″ (0.125″) area inside the trim line. Do not put critical information or images within the Safe Area. This is to prevent minor cutting variations from leaving unintended results at the trim edge.
  6. If you want printed borders, they must be placed a minimum of 1/8″ (0.125″) inside the trim line and include bleed. This is to prevent minor cutting variations from leaving unintended results at the trim edge.

View our File Setup Templates